1. Getting started
1.1. Requirements
Supported Operating Systems (development requires an installed Unity 64-bit editor on the given operating system):
Microsoft Windows
Ubuntu 24.04 LTS
Ubuntu 22.04 LTS
- Supported Unity Versions (development), versions in bold are LTS versions and are more thoroughly tested:
2022.3
Unity 6.0
Unity 6.1
Unity 6.2
Unity 6.3
NOTE: It may work in earlier versions of Unity, such as 2022.x.
1.2. Installing the plugin
As of version 5.0.0 (2024-03-15), AGX Dynamics for Unity supports two separate methods of installation depending on your specific project setup and needs. These methods consist of installing the plugin in an Asset context or a Package context. When the plugin is installed in an Asset context, the plugin files (such as the script files, shaders, resource files, binaries, etc.) are located in the projects Assets folder. This means that the plugin itself is an integrated part of the project.
In contrast, when the plugin is installed in a Package context, the plugin files are not necessarily part of the project. Instead they might be located elsewhere on disk or on a server. This can be favourable when working as a team on a project as the plugin files can be installed automatically by Unity when the project is opened while still omitting the plugin files from source control.
1.2.1. Installing the plugin as an asset plugin
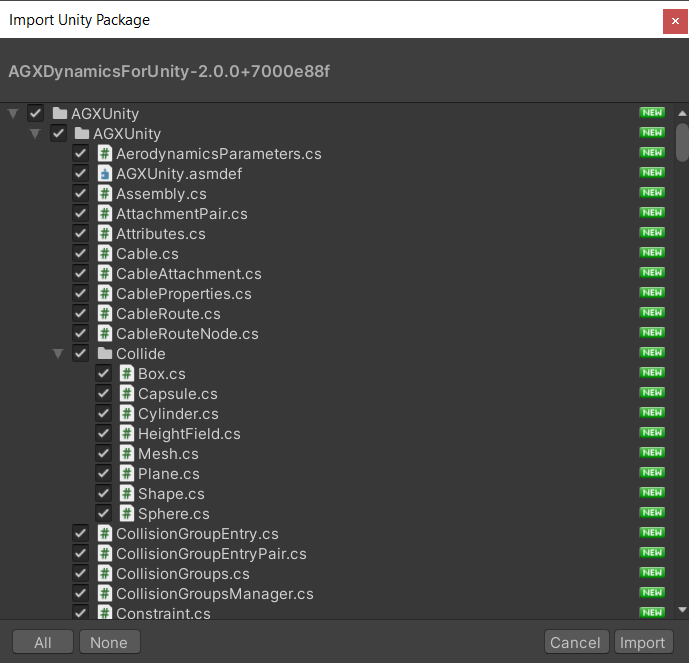
The AGX Dynamics for Unity plugin is distributed in it’s entirety as a .unitypackage file and can be downloaded here.
Import the package into your project.
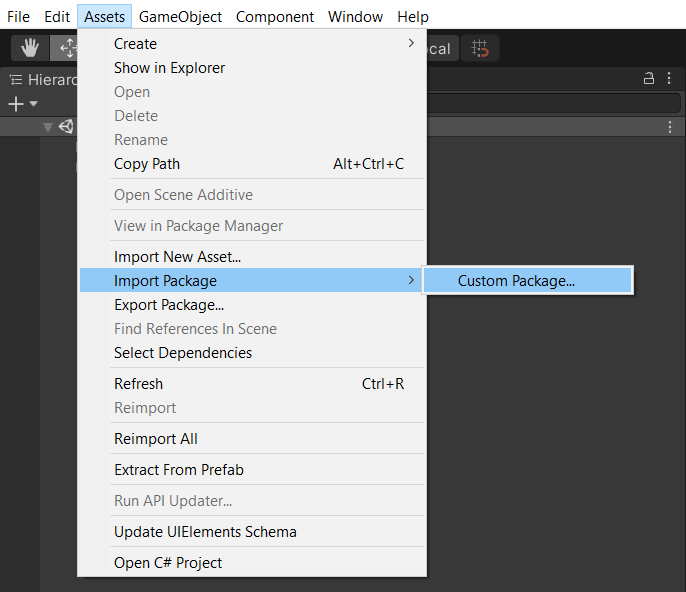
Select the downloaded AGX Dynamics for Unity package and click Open then Import.
(optional) Check the AGX Unity settings and set recommended project settings. See Editor Settings for more information.
Note
If Unity is catching DllNotFound exceptions of agxDotNetRuntime.dll - restart Unity.
1.2.2. Installing the plugin as an UPM package
As of version 5.0.0 (2024-03-15), the AGX Dynamics for Unity plugin can also be installed through the UPM following the procedures outlined in the Unity UPM documentation. Note that the plugin is not currently hosted in any scoped registry by Algoryx but could be hosted in private registries if needed. It is currently recommended that Package context-installation is performed via Git:
Open the UPM window

Select the “+ > Add package from git URL…” option in the package manager window.

Enter the Git URL of the AGX Dynamics for Unity repository. It’s recommended to additionally specify the desired version’s corresponding RC branch, eg.
https://github.com/Algoryx/AGXUnity.git#rc/5.0.0.
After installing, the plugin will ask to select a directory containing an AGX Dynamics installation. Please refer to the Required versions table on GitHub for which specific AGX Dynamics version to use with which AGX Dynamics for Unity version. If the required version is not already installed, it can be installed here: https://www.algoryx.se/download/.

(optional) Check the AGX Unity settings and set recommended project settings. See Editor Settings for more information.
1.3. Updating the plugin
Note
If you’re updating from an AGX Dynamics for Unity version 2.4.2 (2021-06-03) or earlier, please follow the steps described in Update from 2.4.2 and earlier to 2.4.3 and later, before updating. See Manual recovery from errors after update if the update already has been performed without the Update Handler.
Note
The Check for Updates… window currently does not support updating the plugin when installed in a Package context. See Installing the plugin as an UPM package.
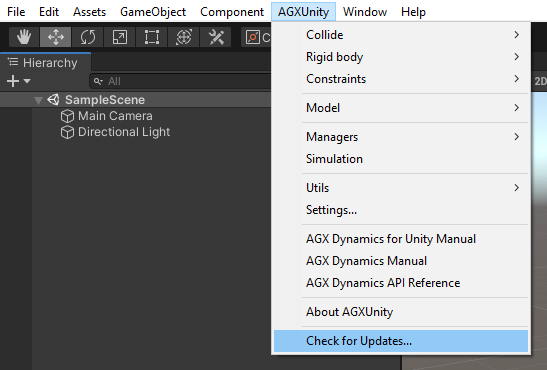
From version 2.0.1 (2020-04-29) there is built in functionality to check for new versions of AGX Dynamics for Unity. When a new version is detected the package can be downloaded and installed.
Open Check for Updates… window from the main menu.
When a new version is available, press Download to start the download of the new package. The package is downloaded to System.IO.Path.GetTempPath() and the package isn’t deleted in the update process.
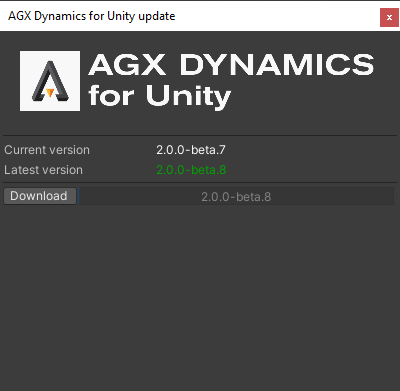

When the package has been downloaded, press Install to to start the installation process.
Note
Unity will be restarted during this update and all content in the
AGXUnityfolder will be deleted (exceptagx.licand user preferences/settings). All other files and folders (underAGXUnity) will be deleted. Make sure any additional files and/or local changes are backed up before updating.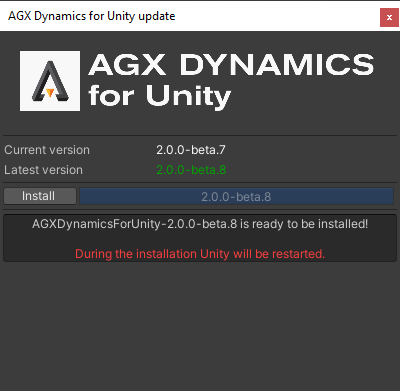
After Unity has restarted the update will continue by removing all the files and folders under the
AGXUnitydirectory. Unity will recompile all scripts in the project several times during this process, and any script referencingAGXUnityorAGXUnityEditorwon’t temporarily compile (compile errors in the Console).
1.3.1. Manual update
The native binaries of AGX Dynamics are loaded into the Unity process. This means that Unity has to be closed before these files can be deleted or modified and that’s why import custom package isn’t supported when AGX Dynamics for Unity already is installed in the project.
Close Unity.
Backup any local changes and/or additional files located in the
AGXUnitydirectory, e.g.,agx.lic.Delete the
AGXUnityfolder in the projectAssetsdirectory.Reopen the project in Unity.
Perform Installing the plugin.
1.3.2. Updating to 5.2.0+ from previous versions
Version 5.2.0 removed a lot of components that were using error prone functionality in Unity.
This means that all older projects have to be patched when the AGXUnity plugin is updated.
Version 5.2.0 added a script which patches scenes and prefabs that use the old components
to preserve the scene setup from prior versions. When opening a project after updating the plugin
the user will be prompted if old components are found in the scene. The patch procedure can also be run
manually by selecting AGXUnity > Utils > Apply 5.2.0 Patch in the top menu. Please ensure that the
project is backed up before running the patch procedure.
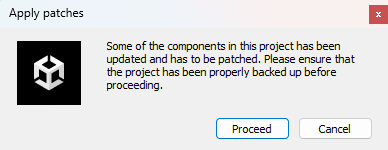
The patch dialog shown when old components are detected in the project.
1.4. Licensing
This software is dependent on the multi-purpose physics simulation engine AGX Dynamics and requires a valid license to run the simulations. Visit AGX Dynamics for Unity for more information regarding trial and licensing of this product.
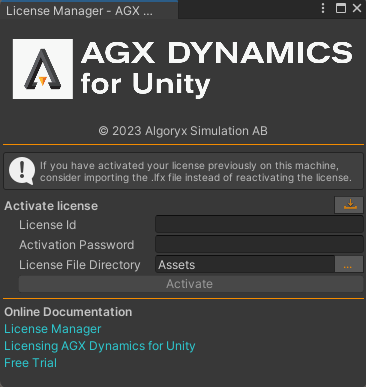
If you have received a License Id and Activation Code for a license, open the License Manager
window from the main menu: AGXUnity -> License -> License Manager and fill in the License Id,
Activation Code fields and select a target directory where the license should be placed. Click
Activate to generate the license file. See License Manager for detailed information regarding
license management.
Note
If you have activated your license in a previous project it is sufficient to copy the created agx.lfx
from that project into the asset folder of new projects. See Activate a license for more information.
1.4.1. Legacy: Activate using agx.lic
Note
Since version 3.0.0 (2021-07-01), introducing the License Manager, some prerequisites regarding license filename and location has been changed. The license file may be located anywhere in the Unity project or build directory hierarchy.
1.5. Start using AGX Dynamics for Unity
After the initial setup and license activation is completed, it is recommended to look through the following resources to help get started with creating custom simulations in AGXUnity.
Check out the available AGX documentation:
Read through the AGXUnity documentation to get a sense of the available components and overall workflow in AGXUnity.
Have a look at the AGX Dynamics user manual for more information about the capabilities of AGX as well as more in depth explanation of the various components.
While many features are exposed as Unity components, some more advanced features are available through a native API. Check out the AGX API reference for information about the native API.
Look through the Examples page and download any relevant examples to start exploring a specific topic.
Watch our YouTube Tutorial series for an in depth explanation of how to use the plugin and the various components.
If you’re stuck. Contact our support at support@algoryx.com
1.6. AGX Dynamics for Unity with HDRP and URP
AGX Dynamics for Unity supports both the default Built-in Render Pipeline as well as the High Definition Render Pipeline (HDRP) and the Universal Render Pipeline (URP). However, the materials that are shipped with the plugin are built for the Built-in RP as this is the default Unity experience and these are upgradable using tools provided in the HDRP and URP packages. In general, it is easier to decide early on in the development which render pipeline to use as the upgrading process is simpler and less error prone in new projects. Additionally it should be noted that upgrading materials is a non-reversible process and as such, backups should be made before the upgrade is performed.
Note
For each of the guides linked, the package version depends on the installed Unity Editor version. Ensure that the documentation page matches your installed package version.
Note
The bulk material upgrade process does not support upgrading materials in imported agx-files as these are imported as sub assets. For these, the imported render materials have to be selected and the corresponding process for upgrading selected materials has to be performed. Please refer to the corresponding documentation of the relevant Render Pipeline for more information.
1.6.1. High Definition Render Pipeline
A guide to upgrading from the Built-in RP to HDRP can be found in the official package documentation. If a completely new HDRP project is created from the HDRP template it is enough to import the AGX Dynamics for Unity package to follow the steps outlined in Upgrading Materials.
1.6.2. Universal Render Pipeline
Similar to the HDRP upgrade documentation, the URP package documentation contains an upgrade guide. When a new URP project is created, the AGX Dynamics for Unity package can be imported and the same upgrade process can be run but only the Material Upgrade is necessary here.
1.6.3. Custom AGXUnity rendering materials
When using custom materials with the custom shaders provided in AGXUnity
(such as the ones used for Cable Rendering or Upsampling Particle Renderer), the proper version has to be selected.
In general, the shader version under AGXUnity/Built-In should be used for the Built-In render pipeline while
the shader version under AGXUnity/Shader Graph should be used for URP and HDRP pipelines. It is however possible
to use the shader graph versions when using the Built-In render pipeline if the Shader Graph package
is installed manually.
To make it easier to use materials across different projects, there is a material converter which converts materials between different versions
to help ensure that AGXUnity materials used in the project are compatible with the chosen rendering pipeline.
This converter is located at AGXUnity > Utils > Convert Rendering Materials.
1.7. Running AGXUnity in headless contexts
This section presents some of the considerations that should be taken when attempting to run a built AGXUnity application in a headless environment. While this section is not comprehensive, it can hopefully help expedite the setup process. For further support, please contact the Algoryx support directly via support.
1.7.1. Running without graphics
When graphics are not required for the simulation, the --batchmode --nographics flags can be passed
to the build unity application to tell it to skip initializing the graphics device. This is useful
when running on devices that does not have a viable graphics device and might help reduce overhead
for applications that does not require rendering.
1.7.2. Running with graphics
Running applications that require rendering is a bit more tricky as Unity requires a valid display device to be configured on the system. In headless contexts this is usually not the case by default.
While the specific setup required to run a built Unity application with headless rendering will differ depending on the specific platform, hardware, and context (docker, server, desktop), the following system will be assumed: Ubuntu-24.04 running in a docker container on an Ubuntu-24.04 host with an Nvidia GPU.
The steps presented should be similar for other setups.
General setup:
Enable “Run in Background” under
Project Settings > Player > Resolution and Presentation.If this option is disabled, the application will not step as it will never have focus in the headless context.
Prepare a built application targeting the image OS (e.g. Ubuntu-24.04 in this case)
Host setup:
Setup Docker using the official Docker installation guide.
Install the Nvidia Container Toolkit to enable access to GPU hardware in the docker containers.
When running the container, add the –gpus all flag to enable accessing the GPU from within the container.
Client setup:
Use the
ubuntu:24.04image as a baseInstall the following packages apt-get install -yq libglu1-mesa curl xserver-xorg kmod pkg-config
Configure the X-Server to use a virtual display.
The following script is used here to download the relevant nvidia utilities and to create a working xorg.conf file:
configure_headless_xserver.shNote that this step cannot be run as part of the image build as it requires GPU resources to be available. Instead, this should be when the container is started before the unity application is executed.
Run the build unity application using the configured X-Display:
DISPLAy=:0 <unity-exec>was used here.
1.7.2.1. Using the host’s X-Server directly
If it is feasible to use the host’s X-Server directly, the docker container can be configured to use this instead of configuring and running a separate X-Server instance. A guide for this setup is available here.